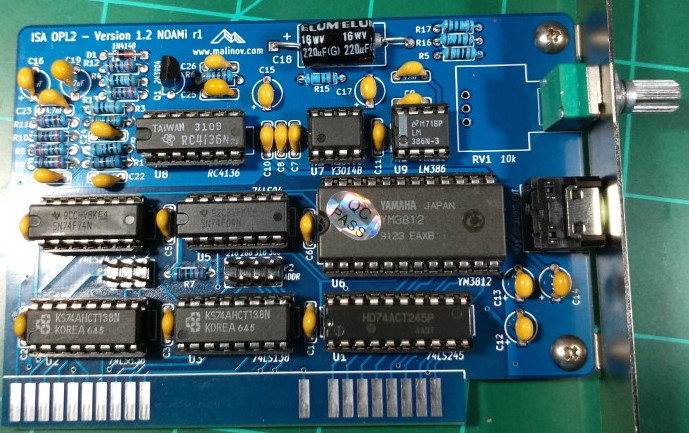
Opl2: Difference between revisions
Numberformat (talk | contribs) Created page with "== Introduction == This is a Adlib Compatible Sound Card. Its based on the OPL2 sound chip. == How to Purchase == This kit is available on my eBay store https://www.ebay.c..." |
Numberformat (talk | contribs) |
||
| Line 18: | Line 18: | ||
== Assembly Tips == | == Assembly Tips == | ||
Board Assembly is simple. Just place the components on the board based on the information printed on the PCB. | Board Assembly is simple. Just place the components on the board based on the information printed on the PCB. Please be mindful of C18 and C19, D1 and Q1 and all the chips. Those have to be placed in a certain way. See detailed pictures. | ||
Shorter components first. | Shorter components first. | ||
Bend the leads to prevent parts from falling out during soldering. | Bend the leads to prevent parts from falling out during soldering. | ||
Revision as of 04:03, 13 December 2021
Introduction
This is a Adlib Compatible Sound Card. Its based on the OPL2 sound chip.
How to Purchase
This kit is available on my eBay store https://www.ebay.com/usr/numberf55/ or for a 15% discount we can transact the old fashioned way. Contact me at support@noami.us or 1 347 604 2083 with your name and order details I will provide a total and instructions for payment by check. Once it clears the item will be sent out.
This Page Updates Often
If you have received this page as a printout then please note that there may have been changes to the instructions below. In order to receive the most up to date information please visit https://wiki.noami.us
Keep this document around for future reference and troubleshooting.
Board Layout
Assembly Tips
Board Assembly is simple. Just place the components on the board based on the information printed on the PCB. Please be mindful of C18 and C19, D1 and Q1 and all the chips. Those have to be placed in a certain way. See detailed pictures.
Shorter components first.
Bend the leads to prevent parts from falling out during soldering.
Post Assembly & Cleaning
Once you have your board assembled you will need to clean the flux off the board. Depending on the flux you used some flux can remain conductive and result in computer glitches.
I have found the following procedure to be very effective in cleaning the board of any type of solder flux.
- Spray WD40 on the back of the board (not kidding).
- Scrub it in both the x and y direction with an old tooth brush.
- Then rinse with water scrubbing it with the toothbrush. Try not to get water on the front side. Little water is okay.
- Then use dish washing detergent with the brush to remove the WD40.
- Perform the final rinse.
- Use a hair dryer to to dry the board and let it sit for few hours before proceeding to the next steps.
Quality Check Procedure
Once the components are soldered check for shorts across C12(5v rail), C13(12V rail), C14 (-12V rail)
Jumper settings
For the default adlib configuration no jumpers required.
Testing
Start up your favorite game and configure the adlib settings. I used multiple different games. For example Commander Keen 4 works great. Attach speakers or headphones to the output jack and adjust the volume.
