ISA Backplane: Difference between revisions
Numberformat (talk | contribs) |
Numberformat (talk | contribs) No edit summary |
||
| Line 284: | Line 284: | ||
# Then click the power button and the power lights should go on. | # Then click the power button and the power lights should go on. | ||
# The -5V regulator is option and if your power supply does not provide -5V then you can solder that in as well. Once the regulator is installed the -5V light should go on as well. | # The -5V regulator is option and if your power supply does not provide -5V then you can solder that in as well. Once the regulator is installed the -5V light should go on as well. | ||
Revision as of 15:26, 8 December 2021
Introduction
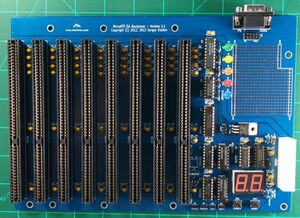
The MicroATX ISA Backplane supports bus width up to 16 bits. It has onboard POST code indicators as well as a -5V regulator allowing you to use it with modern power supplies.

This Page Updates Often
If you have received this page as a printout then please note that there may have been changes to the instructions below. In order to receive the most up to date information please visit https://wiki.noami.us
Keep this document around for future reference and troubleshooting.
Assembly Video
[This video] shows how to put together the kit.
Features
- ATX Power Connector
- 16 Bit ISA bus
How to Purchase
This kit is available on my eBay store https://www.ebay.com/usr/numberf55/ or for a 15% discount we can transact the old fashioned way. Contact me at support@noami.us or 1 347 604 2083 with your name and order details I will provide a total and instructions for payment by check. Once it clears the item will be sent out.
Required Tools
- Soldering Iron
- Rosin core solder
- Wire cutters
- Multimeter (optional: if you want to check for shorts)
Assembly Steps
Start with the shorter components first. This way you can lay the board down flat on the table and be able to solder them in. The taller components go next. The recommended order is as follows.
1. IC Sockets
| component type | reference | Name | Qty |
|---|---|---|---|
| socket | U5, U6, U7 | 14 pin 300 mil DIP socket | 3 |
| socket | U1, U2 | 16 pin 300 mil DIP socket | 4 |
| socket | U3, U4 | 20 pin 300 mil DIP socket | 2 |
2. Capacitors
| component type | reference | Name | Qty |
|---|---|---|---|
| PCB | PCB | 1 | |
| Capacitor | C1 - C51 | 10 uF ceramic, 5.08 mm lead spacing | 51 |
| Capacitor | C52 | 1 uF ceramic, 5.08 mm lead spacing | 1 |
| Capacitor | C53 - C59 | 0.1 uF ceramic, 5.08 mm lead spacing | 7 |
Polarity doesn't matter unless you are using electrolytic ones.
3. ISA Slots
| component type | reference | Name | Qty |
|---|---|---|---|
| Connector | BUS1 - BUS8 | Edge Connector 98 Pin | 8 |
4 LED Lights
| component type | reference | Name | Qty |
|---|---|---|---|
| Diode | D1 - D5 | 5 mm LED | 5 |
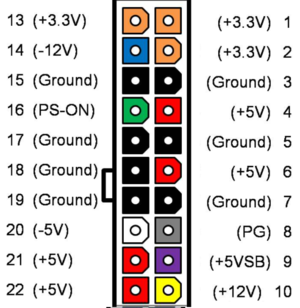
5 ATX Power connector
Board connector as it would appear looking down on the board. The plastic tab will be on the left side towards the inside of the board.
| component type | reference | Name | Qty |
|---|---|---|---|
| Connector | P3 | ATX Connector | 1 |
Jumper Settings
The board has 4 jumper settings. J1 is to enable the voltage regulator and the remaining are for the LED display configuration seen in the section below. Pin 1 of the jumper is the one shaped like a square.
If you purchased this as a kit from my eBay store then then it includes the CD4511 decoder chip and the settings are:
- J1 = 2-3 - enable -5V
- J2-J4 = 1-2, 2-3, 1-2
LED Display Configuration
If you are using the CD4511 decoder and you have made the jumper settings above you can skip this section.
The ISA Backplane board supports a variety of 7-segment decoders and common anode / common cathode type LED displays. Please use the following table to determine the proper jumper pin configuration for J2 J3 and J4
7-Segment Decoders and Matching Displays
The one in bold is the one currently sold with the kit. Please check below for proper jumper settings for this decoder.
| 7-Segment Decoder Type | Hexadecimal Support | Matching Display Type | J2 | J3 | J4 | Built in current limiters 1 |
|---|---|---|---|---|---|---|
| 74LS47, 74LS247 | Limited - Displays distinct figures for codes A-F | Common anode | 2-3 | 2-3 | 2-3 | No |
| 74LS48, 74LS248 | Limited - Displays distinct figures for codes A-F | Common cathode | 1-2 | 2-3 | 2-3 | No |
| CD4511, MC14511, 74HCT4511 | No - Displays nothing (blank) for codes A-F | Common cathode | 1-2 | 2-3 | 1-2 | No |
| Mitel MD4311BE | Yes | Common cathode | 1-2 | 2-3 | 1-2 | No |
| DM9368 | Yes | Common cathode | 1-2 | 1-2 | 2-3 | Yes |
| DM9370 | Yes | Common anode | 2-3 | 1-2 | 2-3 | No |
| DM9374 | Limited - Displays distinct figures for codes A-F | Common anode | 2-3 | 1-2 | 2-3 | Yes |
| D345D | Yes | Common anode | 2-3 | 1-2 | 2-3 | No |
| D346D | Yes | Common anode | 2-3 | Trim2 | 2-3 | Yes |
| D347D | Limited - Displays distinct figures for codes A-F | Common anode | 2-3 | 1-2 | 2-3 | No |
| D348D | Limited - Displays distinct figures for codes A-F | Common anode | 2-3 | Trim2 | 2-3 | Yes |
- No need for current limiting resistor arrays (RR1, RR2), two 470 Ohm resistors should be used to limit current for the decimal point segment.These resistors should be installed between pins 8 and 9 of RR1 and RR2 or a DIP 16 isolated resistor arrays could be used.
- For decoders D346D and D348D the RV1 trimmer should be installed instead of the J3. This trimmer is used to adjust the intensity of the LED display.
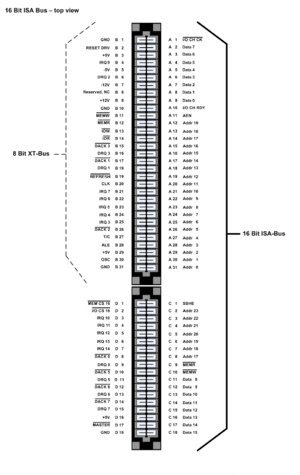
ISA Bus
Click on the image to the right to see detailed 16 bit ISA bus pins.

Post Assembly & Cleaning
Once you have your board assembled you will need to clean the flux off the board. Depending on the flux you used some flux can remain conductive and result in computer glitches.
I have found the following procedure to be very effective in cleaning the board of any type of solder flux.
- Spray WD40 on the back of the board (not kidding).
- Scrub it in both the x and y direction with an old tooth brush.
- Then rinse with water scrubbing it with the toothbrush. Try not to get water on the front side. Little water is okay.
- Then use dish washing detergent with the brush to remove the WD40.
- Perform the final rinse.
- Use a hair dryer to to dry the board and let the board dry for a few hrs.
Power On and Test
The goal is to identify any short circuits that would cause problems. Before powering on the device check to see if there are shorts across any of the rails of the PCB.
- Turn on the backplane and use a volt meter to check voltage across the PCB including the expansion slots.
- Plug in the ATX power connector and the PCB and the standby light should go on.
- Then click the power button and the power lights should go on.
- The -5V regulator is option and if your power supply does not provide -5V then you can solder that in as well. Once the regulator is installed the -5V light should go on as well.
